a painter’s progress …

Rosewall Hill (detail). © Mari French

Rosewall Hill (detail). © Mari French

 … every so often I get the urge to paint hills. I live in Norfolk (not flat, beautifully rolling – well it is where I live) and I love its sweeping beaches and huge skies, but I used to live on the Isle of Skye and I visit Cornwall often, so you can imagine I might enjoy a change in level occasionally. It’s also a change from the more abstract work I’ve been producing lately.

This painting in acrylics and watercolour pastel on deep sided canvas (80×60 cm), is inspired by Rosewall Hill on the Penwith peninsula, Cornwall. Not an accurate representation, I’ll admit, but for me it attempts to capture its looming presence over the moor.

It might not be completely finished yet, but I thought I’d share the progress of the work, step-by-step. Hope you find it interesting.

Rosewall Hill (stage 1). © Mari French. Acrylic and watercolour pastel on canvas depicting uphill landscape in Penwith, Cornwall.

Rosewall Hill (stage 1). © Mari French


I started with a very loose broad brush under-painting in Paynes grey and a mix of Raw Sienna and Titanium white to establish shape and tone (above). As with many of my canvases I prepped it first with a rough coating of texture paste, which I sometimes prefer to a perfectly flat surface.

I deliberately used an unusual colour palette next, of Wedgwood blue, Permanent Rose and a little white, roughly mixed on canvas, to unite the separate areas of the sky and foreground (below). I avoid greens like the plague in my landscapes, in case you hadn’t noticed! They’re too obvious, I prefer colours that create an atmosphere.

Rosewall Hill (stage 2). © Mari French

Rosewall Hill (stage 2). © Mari French

In the process much of the lovely initial under painting is lost, but I’ve learnt not to be too precious about this otherwise I’d  end up too nervous to create an effective artwork. 

I also had to adjust the shape and position of the hill a couple of times. Before the new purple mix dried I splashed and  dropped water here and there, allowing it to run in places, creating pale lines in the paint.

Rosewall Hill (stage 3). © Mari French

Rosewall Hill (stage 3). © Mari French

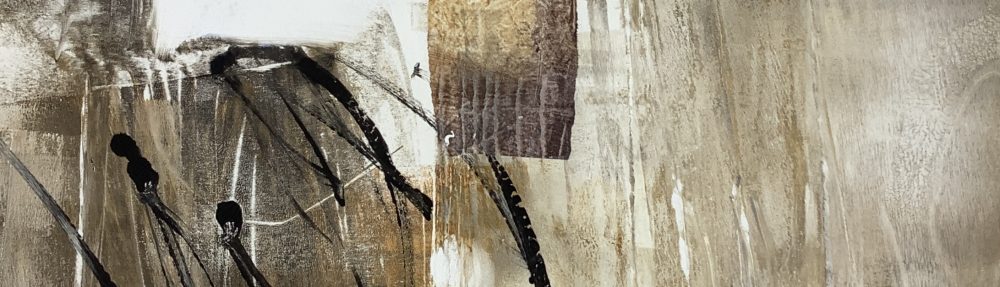
Having left the work for a few days I approached it today wanting to lighten it and get some marks and movement in there (below). Much of the violet colour is brushed over with a dryish mix of Yellow oxide and white, quite fast and vigorously, gain mixing on canvas. I then sprayed with water, semi-dried and wiped back in places. 

Finally, watercolour pastel (neocolour) in black, was scribbled on loosely, hinting at the rough land forms and distant skyline. To allow for any further over painting acrylic matt medium was carefully applied over the pastel and dried.

Comparing the last two stages, I feel the third stage might have made a finished painting, but I’m still excited by the way the work has developed. I’ll post any further changes if/when I make them.

Rosewall Hill (stage 4). © Mari French

Rosewall Hill (stage 4). © Mari French


splash and tell…

Have been so busy producing new work recently (using larger canvases and preparing for a show in London early next summer)… that I realised I hadn’t got round to mentioning the art demo I gave to the Snettisham art group (west Norfolk), a few weeks ago.

'Spontaneity', acrylic/mixed media on watercolour board © Mari French 2011

'Spontaneity', acrylic/mixed media on watercolour board © Mari French 2011

Unfortunately I was too self conscious (stupidly) to take any photos of the group/demo but some of the (rather raw) works (acrylic/mixed-media on board) that I produced in preparation, plus the one I completed in the demo (main pic above) are included here.

I’d never given a demo before (well not of painting… I’ve done plenty in my former life as a graphic designer hooked up to an apple mac). I’d ‘warned’ the Snettisham group I would be demonstrating various techniques as a way of loosening up, mainly in abstracted mixed-media, (I would guess many of them paint in a representational style). So I was only expecting about a dozen turning up, although the group has a large membership. When I arrived (a little early as I thought), the hall was pretty much full… there must have been about 30 people once all had arrived and settled.

I had been nervous in the days leading up to this, to be honest, and babbled a bit to start with, but once I’d started freely bashing acrylic paint and ink onto the pre-prepared surface (watercolour board with pasted down tissue paper) with a large brush, I felt more in my element.

acrylic/mixed media on watercolour board © Mari French 2011

preparation for demo, acrylic/mixed media on watercolour board © Mari French 2011

They were a very welcoming and responsive group, asking questions, laughing at my feeble ‘witticisms’ (thankfully), so I soon relaxed into it. They appreciated the various techniques on the whole… printing with bubble wrap/corrugated cardboard, splashing and wiping back… so I’m hoping that everyone got at least one or two useful tips to help with their future painting.

It’s amazing how quickly two hours can pass once you hit your stride, and also surprising (useful for any tutor), how we artists can take our own knowledge and experience, for granted. It is satisfying to pass on particularly playful and effective methods to help others with loosening up in their artwork.

minerals (mixed media study in preparation for art demo) © Mari French 2011

minerals (mixed media study in preparation for art demo) © Mari French 2011

Time ran away with us at the end, as the group crowded round enthusiastically asking questions, collecting printouts of notes on techniques, recommended art books, materials etc, and browsing through books, sketchbooks and work examples I’d brought along. (I’ve always find these ‘extras’ are very much appreciated at these kind of events).

I’ve been asked to come back next year when the group have their exhibition at Snettisham. It would be great to see some lively gestures and brushwork in there. I wish them luck with their art… and do remember if any of you are reading this…

have fun and allow yourself to play sometimes!

evolution of a painting…

I recently came across these digital photos of the creation of a work I have on display at the Burnham Grapevine Gallery in North Norfolk just now. Titled simply ‘Red landscape’ it is approx 40x40cm, acrylic/mixed media on canvas like a lot of my work. I thought it might be interesting to show how the painting evolved.

step1 © Mari French 2009

step1 © Mari French 2009

Obviously step 1 above sees the work some way on in its progress. I started by covering the box canvas with a smooth texture paste that I use, spread liberally and loosely with a palette knife. Before this dried I embedded various materials into it such as fine muslin and string, also pressing pieces of corrugated cardboard (peeling off the covering layer on one side, revealing the ridges) to create interesting areas of texture. Then, using a large (4 inch) soft brush – I applied a mix of burnt sienna and yellow ochre mixed with matt medium all over. When that was almost dry, I swept paynes grey across parts of the upper middle and lower foreground, resulting in the above image (step 1).

step 2 © Mari French 2009

step 2 © Mari French 2009

In step 2 above, the sky area, horizon and foreground are suggested with parchment (a pale cream colour I find a bit gentler than white) giving some definition to what I could now visualise as a fieldscape, albeit an abstracted one. This was allowed to dry thoroughly.

step 3 © Mari French 2009

step 3 © Mari French 2009

Step 3 demonstrates the rather drastic technique I often use of sweeping darker paint over  the canvas with loose strokes concentrating on getting into all those bumps and ridges of texture. Before it dries I wipe most of it away with damp rags (have to be pretty quick here). Although this may seem a waste of time (and paint!) I find it gives a subtle depth to the final painting. Incidentally I use a hairdryer to speed up drying times for most works.

I then warmed up the painting with more burnt sienna and yellow ochre mix, and yellow ochre on its own, used fairly dry so it retained the brush strokes, to indicate ‘field’ areas. The finished work is shown below and also a close-up detail showing how the paint clings to the texture of the muslin etc.

Red landscape © Mari French 2009

Red landscape © Mari French 2009

'Red landscape' detail © Mari French 2009

'Red landscape' detail © Mari French 2009