 © Mari French 2011")
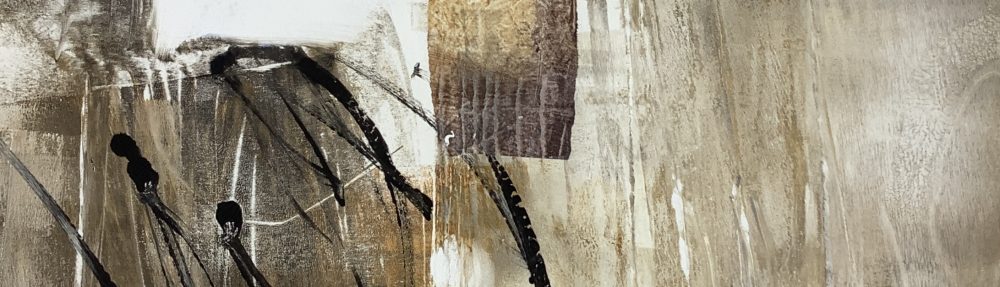
Harvest moon 2 (collagraph) © Mari French 2011
Last weekend I enjoyed the most inspiring and creative weekend collagraph printmaking workshop with Laurie Rudling at Salthouse, north Norfolk. The workshop was incredibly good value for money, being heavily subsidised as part of the Salthouse 11 art project. Laurie is an incredibly professional printmaker and effectively passes on his knowledge in an enthusiastic, instructive and effective way, packing a lot into the two day workshop.
")
Collagraph workshop with Laurie Rudling (© Mari French)
Collagraphs are a method of (intaglio) printmaking created by collaging materials of a similar thickness, eg bits of sandpaper, wallpaper samples, muslin cloth etc, onto a simple (in this case cardboard) plate, creating textures and shapes that will show up when inked and passed through a press. The ‘plate’ is then varnished to make it more durable for inking and printing. Approx 15 to 25 prints are possible from such a plate.
Collagraph printmaking can also be kinder to the environment too, in that it uses no harsh chemicals such as acid, it makes use of scrap materials and the oil-based ink can be efficiently cleaned with simple vegetable oil.
Below you can see the basic collagraph plate from which I produced the ‘Harvest moon’ prints in this post. What I found most fascinating is that the most humble and unpromising materials can result in really interesting textures in the resulting print. The sky on this plate is sandpaper, the lower ‘field’ textures are scraps of B&Q wallpaper samples.

basic collagraph plate - 'Harvest moon', Mari French
Once inked up the ink is forced into the indentations and textures of the plate, as opposed to relief printmaking (such as linocuts), where the ink sits on top of the raised areas. To oversimplify, colours are added by either sweeping a contrasting ink colour over the first or by diligently inking up individual areas in different colours.

Harvest moon 3 (collagraph) © Mari French 2011
The method of building up overlapping layers, creating further shapes, is an alternative method of collagraph platemaking shown in the second ‘Arches’ plate below left.
")
simple layered collagraph plate (Arches © Mari French)
I found it fascinating that by ‘playing’ around like schoolchildren with bits of paper, glue and scissors, it was possible to produce such creative prints.
Although most of the students on the workshop were artists or had some creative experience, none of them had made collagraphs before. Yet as you can see from the photos of some of their work further down this post, they produced some stunning collagraph prints.
Much of this was due to the encouragement, patience and experience of our tutor. Laurie Rudling also holds workshops at the Broadland Arts Centre at Dilham near North Walsham in Norfolk.
 © Mari French 2011")
Arches (collagraph) © Mari French 2011
")
Poppy collagraph prints produced by fellow student Dee (photo © Mari French)

Collagraph workshop - students' work (photo © Mari French 2011)


 © Mari French 2011")
")


")
 © Mari French 2011")
")


